

What Is Raspberry Pi 3 Used For
In this Raspberry Pi GPIO tutorial, nosotros are going to have a look at all the nuts of the GPIO pins or also known equally the general purpose input and output pins.
These pins are to communicate with other circuitry such as extension boards, custom circuits, and much more.
Yous can make some pretty cool stuff past using these pins. We volition look into a lot more projects in the future that make employ of these pins.
There is quite a bit to know about these pins, and I highly recommend that you practise follow this guide to get a ameliorate agreement before you lot start playing around with them.
Also, exist certain to check out our video on the Raspberry Pi GPIO under the equipment listing. It will take you lot through all the basics you need to know to get started.
Alarm: Experimenting with the GPIO is risky and has a adventure of bricking your Raspberry Pi. Knowing the power limitations of the GPIO pins and too understanding what you're plugging in is a must.
Equipment
The equipment that I employ in this Raspberry Pi GPIO tutorial is listed below.
Recommended
- Raspberry Pi
- Micro SD Card (8 GB+ Recommended)
- Ethernet Cable or Wi-Fi
- 100 ohm resistor
- Red LED
- GPIO Breakout Kit
- Breadboard
- Breadboard Wire
Optional
- A Raspberry Pi Example with access to the GPIO pins
Video Tutorial
Our video will take you lot through all the topics explained in this guide. If you larn better by listening and seeing, and so I highly recommend that you check out the video.
If you exercise like the video, and so please subscribe to u.s.a. or follow u.s. on social media, so you lot stay upwardly to date with all the coolest Raspberry Pi projects, guides and much more.
Adblock blocking the video? Support u.s. past subscribing to our ad-free service.
Raspberry Pi GPIO Tutorial
Now let's go started on this Raspberry Pi GPIO tutorial, we will be taking a look at the dissimilar types of pins that bachelor, how to enable the modules, what a breakout kit is and finally how to build and program a simple excursion.
If you're an owner of a Raspberry Pi B+, ii, Goose egg or 3, so you lot will have twoscore pins in total. The before models, such as the Raspberry Pi B have just 26 pins.
Meet below for the Raspberry Pi GPIO pinout diagram. We have included all iii iterations of the Pi for the pinout diagram.
If you want a PDF version of the pinout diagram, you tin can discover it for download here.

As you can see at that place are more than merely your standard pins in that location are some that reference I2C, SPI, and UART.
- GPIO is your standard pins that can be used to turn devices on and off. For example, a LED.
- I2C (Inter-Integrated Circuit) pins allow you to connect and talk to hardware modules that support this protocol (I2C Protocol). This protocol will typically take up two pins.
- SPI (Serial Peripheral Interface Double-decker) pins can exist used to connect and talk to SPI devices. Pretty much the same every bit I2C but makes use of a different protocol.
- UART (Universal asynchronous receiver/transmitter) is the series pins used to communicate with other devices.
- DNC stands for do not connect, this is pretty self-explanatory.
- The power pins pull power directly from the Raspberry Pi.
- GND are the pins you apply to footing your devices. It doesn't matter which pin yous employ every bit they are all connected to the same line.
All this might be daunting at first, but it'southward pretty easy one time you get going. A lot of the abbreviations and technical jargon is easy to turn people off straight abroad.
Configuring and using the Pins
In this section, we will briefly touch on how to prepare the pins so that yous can use them on the Raspberry Pi. We volition go lots more into actually programming and using the pins in time to come Raspberry Pi projects.
In this example and in hereafter projects, we will be using Raspbian. If you haven't got it installed, then you can find out how to install the latest version past following my Raspbian installation guide.
Configuring GPIO
If you're on the latest version Raspbian, then you lot tin can start programming and using the GPIO pins without needing to practise whatsoever extra configuration.
However, I recommend that yous update your Pi to the latest packages anyway. If you haven't done this, and then yous can do it by running the following commands.
If you lot don't have the GPIO package installed you but install information technology past running the following command.
Configuring Raspberry Pi I2C
Setting up the I2C pins on the Raspberry Pi is super easy and will only take a couple of minutes to do.
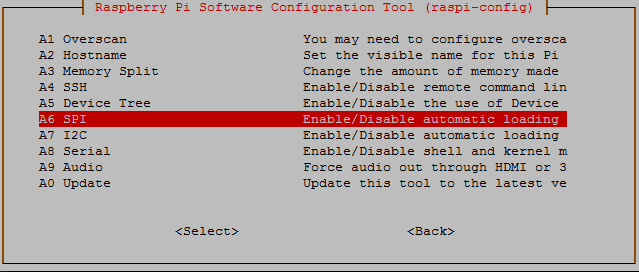
Firstly, become to the Raspi-Config tool by entering the following control.
In here get to Interface Options and and so to I2c, enable I2c by selecting Yep.
The Pi should now alert you that I2C will be enabled after reboot. It will then ask if you want it to be loaded by default. Select yes if you plan on using I2c every fourth dimension the Raspberry Pi boots upwards.
Now we desire to make certain it has successfully enabled the necessary modules. To practise this, enter the following control.
This command will return any modules that are running, starting with i2c. It should return something like this i2c_BCM2708.
Configuring Raspberry Pi SPI
Configuring the Raspberry Pi SPI is much similar the I2c and is super easy, it volition only take a couple of minutes to do.
Firstly, go to the Raspi-Config tool by entering the following command.
Once the config tool has loaded, go to Interface Options, and so to SPI.
Enable SPI, and it volition tell y'all that information technology will exist enabled afterward reboot. Afterwards that, it will ask if you lot want it to be loaded past default. Only select Yeah if you plan on using it every fourth dimension the Pi boots upward.
To check that SPI is successfully upwardly and running apply the post-obit control.
This control will return whatsoever modules that are running, starting with SPI. It should return something similar spi_bcm2835. Make sure you have restarted your Pi before checking to run into if the module has been loaded.
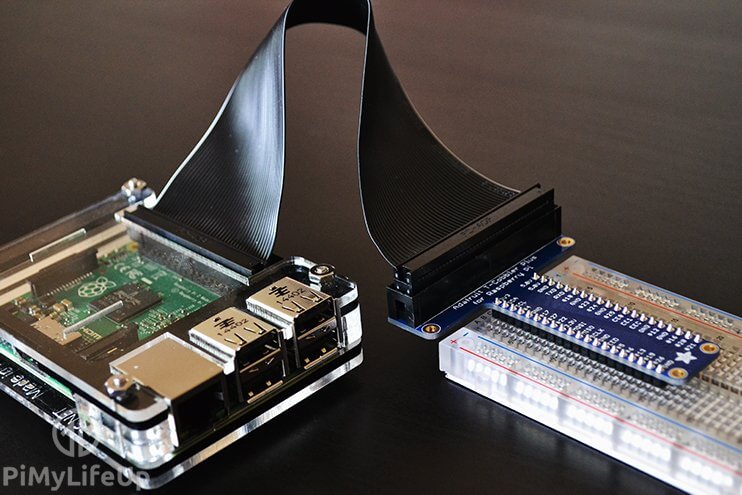
Using a Breakout Kit
A breakout kit allows you to take all the pins via a ribbon cable and connect them to a breadboard or a dissimilar device. This kit makes it a lot easier and safer than working in and around the Raspberry Pi.
At that place are a few different types of breakout kits that you're able to buy for the Raspberry Pi GPIO pins.
Personally, I prefer the T blazon as they are easy to read and apply. If you're looking for a breakout kit to buy, then exist sure to bank check out the equipment listing above.
When connecting the ribbon cable, you demand to make sure it is connected, so information technology is facing away from the board. You tin can encounter an example of a correct setup ribbon cable with a T blazon breakout board right below.

Programming with the Raspberry Pi GPIO Pins
Programming with the GPIO pins on the Raspberry Pi is typically done using the programming linguistic communication Python. This item circuit and code is super easy to go going and won't accept you long at all to complete.
If coding sounds like it may be a little too involved for you and would prefer a simple solution, then something like Raspberry Pi Cayenne might interest you. The software package allows you lot to add sensors, control GPIO pins, and lots more than with a super easy user interface.
GPIO BOARD vs GPIO BCM
There is a massive difference between these two different modes, and information technology'south up to you which one you want to take advantage of for your project. Both have their own pros and cons.
GPIO board (GPIO.Board) references the concrete numbering of the pins. For example, the elevation left pivot is one, and the top right pivot 2. It continues to count upwards as you go from tiptop to bottom until you run out of pins. In our diagram, you can meet this numbering in the heart of each group.
GPIO BCM (GPIO.BCM) is the Broadcom Soc Channel numbering. In the diagram above, you can notice the number after GPIO. For example on the Raspberry Pi three, the pin below 3v3 is GPIO2, so the number for this pin is 2 in BCM mode.
A downside to BCM is they have changed betwixt versions (Raspberry Pi Rev 1 vs Raspberry Pi Rev 2) and may exercise in the future. If you want to be safe, I recommend sticking to GPIO Lath merely equally I said earlier, it's up to yous how you want to reference the pins.
The Code for a Unproblematic LED Excursion
If you lot're happy to lawmaking and learn lots about Python, then check out my example below.
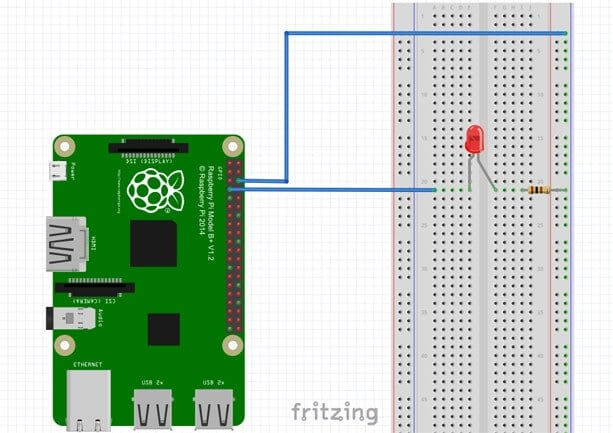
Firstly, let's set our trivial circuit. I accept a helpful like shooting fish in a barrel diagram to follow below. If you have a breakout kit, the excursion will obviously be a bit different since your wires volition come from the cobbler.
Alternatively, only connect the positive end of a LED upwards to pivot seven (GPIO4) and the negative end to a resistor that connects to a footing pin.
Now let'due south create a Python file then that we tin can type out our Python script.
Let'south write out a little script. It's of import to remember Python is whitespace sensitive.
For example, in the for loop, make certain y'all have four spaces for anything inside the loop. To explain a little further, the GPIO.output(7, true) line will need to have iv spaces before it.
Now exit and relieve by pressing ctrl+ten and so y.
If you run our piffling script, the excursion should come up to life.
You can run a Python script by doing the following control. It is also important that you run it as the superuser using sudo.

I hope that this tutorial has helped introduce you lot to the basics of the GPIO pins.
As I mentioned earlier in this guide, I will be doing a lot of projects that utilise the Raspberry Pi GPIO pins in the future. This range of projects includes using motions sensors, temperature gauges, controlling motors, and much more than.
If you take whatever questions, feedback or if I missed annihilation, then feel free to drop us a comment below.

What Is Raspberry Pi 3 Used For,
Source: https://pimylifeup.com/raspberry-pi-gpio/
Posted by: glessnersopland.blogspot.com
0 Response to "What Is Raspberry Pi 3 Used For"
Post a Comment